This article explains how to translate messages for recipients in Messages XR Enterprise, including how to manually select languages, use auto-translate on send, and configure translation defaults in Delivery Options.
💡Quick answers
- What translation options are available when sending a message? There are three options: manually select specific languages, use Auto-translate on Send to translate into all recipients' preferred languages at once, or configure a default translation setting per organization in Delivery Options.
- Enabling auto-translation by default for your organization? Go to Settings > Organization config tab, select the organization, open Delivery Options, scroll to Translation, and check the box next to "Use Auto-translate on Send feature by default."
- How do I send translations in only two or three selected languages? Open the Languages dropdown in the message view, click Select Languages, check the boxes for the languages you want, and send.
- When does the blue Translate All Languages button appear? It only appears when your recipient list includes at least one recipient with a non-English language preference.
- What do recipients receive if their language is not in the selected translations? They receive the default English version of the message.
Option #1: Manually select 2–3 languages
Use this when you want to send translations in just a few selected languages.
- Add your Subject, Recipients, and Content.
- Skip the blue Translate all __ (#) languages button. Instead, open the languages drop-down, click Select Languages, and check the boxes for the languages you want (e.g., Spanish, French).
Important Note
If your recipient list includes only English speakers, the blue Translate All Languages button will not appear. Once you include at least one recipient with a non-English language preference, the blue button and language selection options will become available.
- Preview translations by selecting each language from the drop-down.
- Click Send.
Recipients who match the selected languages receive the translated version. All others receive the default English version.
Option #2: Translate into all languages with preview and edit
Use this when you want full coverage and control over each translation, including the ability to preview and edit. For this option, the Auto-translate on Send option is disabled so that you can manually select the options in the Languages & Translation section and fix the issues manually.
Here's how it works!
- Add your Subject, Recipients, and Content.
- Ensure that the Auto-translate on Send toggle is disabled and not toggled on.
-
Click the blue Translate all __ (#) languages button in the blue box.
- If there are any issues with translation, you will be prompted to Fix languages, also telling you which languages have details that need attention.
- Select the language(s) that need fixed in the dropdown. Then make any edits in the channel that displays a warning symbol.
- Once the fix has been successful, the warning symbol will no longer display next to the language with the issue.
- Now you can either click Send message or Schedule your message for a time in the future.
Option #3: Auto-translate enabled with quick send
Use this to auto-translate into all included recipients' languages.
- Enable the Auto-translate on Send option.
- You can change the default setting by going to Organization Config > Delivery options in the Translations area.
- Add your Subject, Recipients, and Content.
- If the system detects an issue (like exceeding an SMS character limit in a specific language), a red warning will appear in the message bubble, and a pop-up window will display the message: Something needs fixing before sending.
- Any language with issues (e.g., character limits in Arabic) will be flagged in red for review.
- The pop-up offers two immediate options: Back to editing or Apply & send.
Select Back to editing 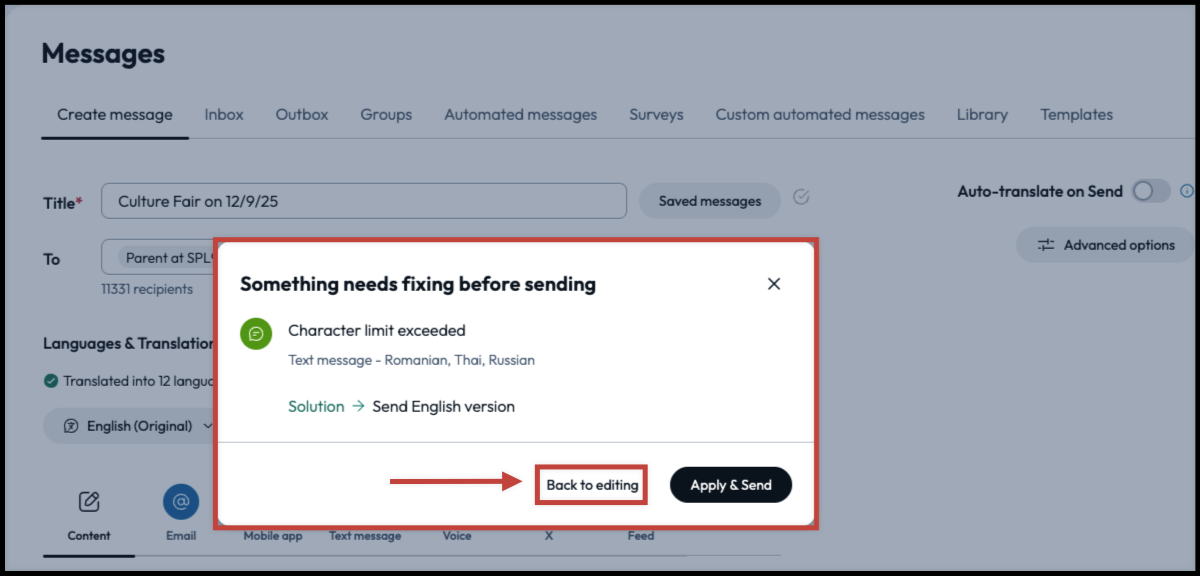
This selection will take you back to an editing screen where you can address the languages that might have channels exceeding character limits.
For this example, you can see in the screenshot that there are three languages that need to be fixed: Romanian, Thai, and Russian.
We select Russian language in the dropdown, and then select the channel with the warning symbol. This will then populate the Russian translation into the text window below. To get the warning symbol on the channel label to disappear, shorten the text.
- Make edits or shorten your text as needed to any languages you may want to send in, then click Send.
Select Apply & send
You also have the option, if you're in a hurry, to select Apply & send.
This selection will disregard those languages that need edits and send in English instead.
Important Note
If Auto-translate on Send is enabled by default for your organization, this workflow will apply automatically. To manually select or edit translations, you’ll need to turn off Auto-translate on Send before composing your message. Once disabled, you can follow the workflows outlined in Option #1 or Option #2.